A Dose of Reality From Mauro Pilates


It was embarrassing.

I considered myself a reasonably fit guy, but suddenly I was being asked to do things my body just couldn’t figure out. Not only that, but it was happening routinely.

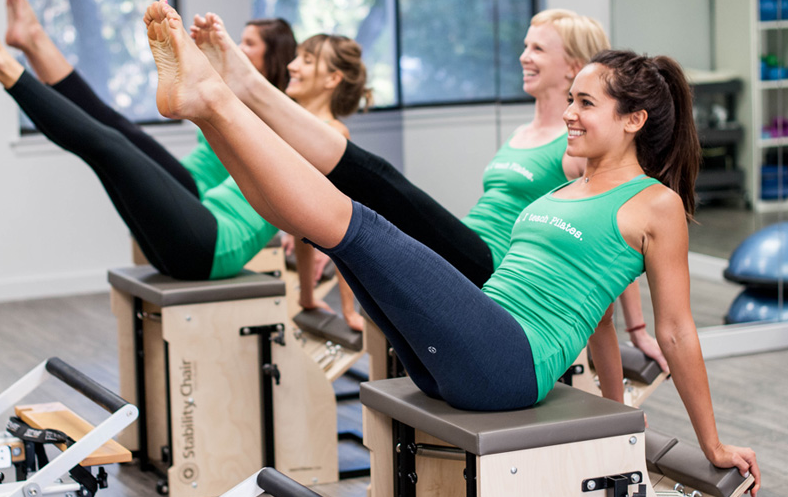
I’m not talking about a bootcamp, crazy calisthenics, or the next breakdancing craze. I’m describing straightforward, well-intentioned Pilates instruction from Liana Mauro of Mauro Pilates.

Sometimes, balance and coordination are key.

Sometimes, balance and coordination are key.

I was okay with the basic movements. A leg press on the reformer, or a straight arm pulldown from overhead to my sides (like a lat pulldown, for those familiar) came relatively easy.

But then, Liana took me through exercises that I had apparently swept under my strength-and-fitness rug. Balance on opposing hand and knee on an unstable surface? Simultaneously engage my core and twist through my trunk? Or, god forbid, work the muscles on the side of my pelvis with a leg-lift or hip rotation? Forget it. Not happening.

Read More

Liana Mauro on 10 Ways Pilates Can Help You


Mauro Pilates

Let’s get one thing straight: I am not a Pilates expert.

I do know a thing or two about staying healthy and injury-free, however.  And I know when I’m out of my league when it comes to knowledge about a particular discipline, especially in the health field.

So, when I wanted to learn more about Pilates, and how it could help both me and my patients, I tracked down Liana Mauro.  I’ll be posting a full run-down of my experience with Liana and her staff at Mauro Pilates soon.

For now, know this: Liana is patient, careful, observant, and knowledgable about putting together a Pilates regimen that is effective, fun, and safe.  I don’t hand over the reigns of my blog frequently, so trust me when I say that you’re in excellent care with the information presented below.

Be sure and read down to the end of the article, where Liana has included an enticing offer.  This wasn’t solicited, and I include it here only because Liana is a practitioner I respect and think should be more widely known.

Welcome Liana Mauro….

10 Ways Pilates Helps Heal and Prevent Injuries

Read More

Don’t Be Normal


Last time we talked about sleep, and how many have a skewed idea of what “normal” sleep is.

From waking frequently in the middle of the night, to only sleeping 4-5 hours at a time, to not being able to fall asleep at all, they somehow think that dealing with these issues on a regular basis just makes it part of the ordinary human physiological landscape.

Shoulder, arm, and hand pain, is another group of common complaints patients mention. Any sort of nagging pain in the upper extremity is also frequently accepted as something that is just “part of getting old” or from some previous injury that can’t be helped. Neither is true.

Often, part of the problem is misdiagnosis. Take Carpal Tunnel Syndrome, for example. Carpal Tunnel Syndrome, or “carpal tunnel” as it is more commonly referred to, is a condition that affects the hand and is caused by compression of the median nerve, which runs through a passageway in the wrist, a tunnel formed by bones, ligaments, and fascia.

The median nerve sends signals from the thumb, index, and one-half of the middle finger so that you can feel sensations in those digits. It also supplies stimulation to small muscles that control some motions in these same fingers. Sensation and movement on the pinky side of your hand is controlled by the ulnar nerve, which does not pass through the carpal tunnel.

That last point is key. The median nerve runs through the carpal tunnel. The ulnar nerve does not. This means if you experience pain, tingling, or numbness in your entire hand, the problem can’t be originating solely in the carpal tunnel!

It is much more likely that the problem is coming from an area that is affecting both of these nerves simultaneously. Yet we frequently see patients in the office with pain or numbness in their entire hand who have been diagnosed with Carpal Tunnel Syndrome.

Even worse, surgery is often recommended and performed on these patients, inevitably and unfortunately resulting in no relief from their symptoms. Simply understanding how the nerves are anatomically positioned — the “wiring diagram” of the body, avoids many problems with misdiagnosis and inappropriate treatment.

Understanding these relationships is important for complaints besides hand pain. Nerves that supply our extremities originate from the spinal cord in large bundles. As they travel farther away from the cord they branch into smaller and smaller segments, splitting up to cover areas of skin, muscle, and other tissue. The closer to the cord a nerve gets caught, compressed, or otherwise irritated, the larger the area of potentially affected tissue.

Many people are familiar with the radiating pain down the leg commonly called “sciatica.” This pattern of radiating pain from the spine down an extremity doesn’t just occur in the legs. I frequently see patients with symptoms in their shoulder, arm, or hand that originate in the neck. The culprit is the same as in the lower extremity: something around the spine impinges the nerve root that supplies skin and muscle further down.

Pain, tingling, or numbness is thus experienced at a place distant from the source of the problem. Biomechanical relationships in the arm are also altered which can add further irritation to any joint or muscle in the area.

Again, understanding the anatomy is crucial. Just like in the lower back, in between each vertebrae in the neck are discs with a fibrous outer ring and gel-like material in the center. Nerves come out of the spinal cord between the vertebrae, right where the discs are. This means anything that might cause the disc to bulge or herniate has the potential to affect the nerve root.

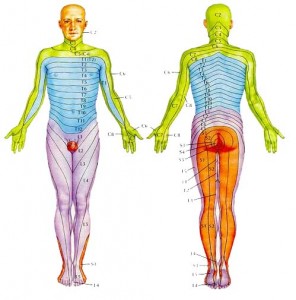
The nerves in the neck supply the muscles of the arms and provide the skin’s sensations in predictable patterns called dermatomes.

dermatomeB

Doctors can use this knowledge to help determine what nerve root might be affected with someone experiencing, say, hand pain in their thumb and index finger.

Take another look at the dermatome photo. Pain in this area, in addition to simply being a problem local to the thumb, could also originate around the 6th cervical vertebra. Your doctor should be able to distinguish between the two.

Aside from the more obvious causes of shoulder or arm pain — falls, sprains, etc. — the most common cause of upper extremity pain I see in the office is habitual. That is, something we do every day as part of our normal routine or posture can bring about aches, pains, tingling, or numbness that seems to have no particular cause. This is prime fodder for the “I’m just getting old” or “I must be out of shape” explanations that float around the water cooler.

In particular, poor neck posture seems to be a major culprit. Anything that routinely brings the chin closer to the chest seems to lead to the type of pain described. Bringing the chin closer to the chest flexes the vertebrae in the neck forward. This position creates wedging of the vertebrae, with the front edges closer together and back edges farther apart.

Remember the discs between each of the vertebrae? When this wedging happens, the discs have to go somewhere. Being more fluid in nature, with the vertebrae wedged together in the front, the discs tend to push out toward the back. If this happens over a long period of time, eventually the discs can bulge or even herniate.

When any of this disc material — or any other anatomical tissue, for that matter — starts to abnormally push on a nerve, it’s a problem. The nerves at this level supply everything you can think of in the upper extremity. Shoulder pain, elbow pain, tingling down the arm, or pain in the wrist and hand are all fair game, to name a few.

So what qualifies as a bad habit? Reading in bed or watching TV with your head propped up. Routinely using a laptop or even a desktop computer with the monitor too low. Long periods of studying or writing with the material on the desk under your chin. Handwork, such as knitting, done with your hands close to your chest. Sleeping on your back with your head on a pillow that is too high, or on your side, curled up tightly in the fetal position.

There are many others. The bottom line is: if you keep your chin down close to your chest for long periods of time doing anything, you have the potential for this sort of problem.

The good news is that fixing this problem is generally not complicated as long as you find someone who can properly diagnose what’s happening. Once you’ve done that, treatment is relatively straightforward.

Chiropractic adjustments help tremendously. The adjustment has to be done in a position and direction where the nerve root is not impinged in any way. When done properly, this seems to clear the nerve root of any impingement and minimize any radiating symptoms experienced.

But the adjustment isn’t the whole fix. Lifestyle habits must be changed. In other words, keep your chin up!

This is crucial to keep the vertebrae aligned and free of any wedging so that things have time to heal. This is analogous to having your skin cut with a knife. The wound will heal cleanly with minimal scarring if it is dressed properly and the edges are held closely together with stitches.

On the other hand, if every day you go in and spread the wound apart with your fingers, you’ll be left with a nasty scar or, worse, the wound won’t heal at all.

Once the adjustment is made and lifestyle habits are addressed, residual issues can be tackled. Long periods of time with poor or diminished function and improper biomechanical support to tissue in the shoulder or arm can leave joints inflamed and muscles gnarly. Get in with a good Applied Kinesiologist, Rolfer, or massage therapist to work out the kinks.

Don’t let anyone tell you that the types of pains I’ve described here are a “normal” part of life. Keep your detective cap on and take an inventory of your usual activities that could be contributing to your condition. With a little persistence you can pass up that “normal” life for an optimal one!

Set Up Your Space


It wasn’t my habit years ago to walk into your average office and cringe at the sight of workers sitting at their desks. I have to confess that that sort of reaction is exactly what takes hold of me nowadays.

After seeing many patients that need treatment for everything from numbness and tingling in their fingers to debilitating lower back pain, it quickly became obvious that the desk posture of the average American office worker really isn’t working out. Home computer users needed plenty of help, too.

This article is dedicated to those of us who’ve made the jump to the information age. If you use a computer, read up. You need this information.

We’re going to walk step by step through setting up your computer workspace. You’ll be rewarded with a much less stressful setup that will treat you better long term.

A Good Foundation

We start with your chair. The more adjustable, the better. The base, or seat, of the chair should not only raise and lower, but ideally it should be able to tilt forward and back.

That is, the edge of the base that is closest to your knees should be able to lower relative to the edge that is closest to the back support.

You need the base of the chair higher than you think. You want to be able to raise the base so that your hips are significantly higher than your knees. Say, at least 4-5 inches.

Stand up. Place one hand at the small of your back and the other on your tail bone. Keeping your hands where they are, slowly sit down onto a low chair that has your hips even with your knees. Feel how your lower back rounds out substantially?

Now start over in the standing position. This time, sit down onto a taller chair, stool, or even a tabletop so that your hips are well above your knees.

You should notice that your lower back doesn’t round out as much, keeping your spine in a more neutral position and the weight of your torso centered through your pelvis. When you’re in the right position, even your feet will feel more grounded on the floor.

Here’s where the base tilt comes into play. With your hips higher than your knees, on some chairs the front edge of the base will dig into the backs of your thighs.

Tilting the front edge of the base downward eliminates this pressure, and also has the beneficial side-effect of slightly rocking your pelvis forward into an even better position.

If your chair doesn’t have this feature, you can accomplish the same thing with a small pillow or wedge, with the thick part toward the back.

Now that the base is at the optimal height and tilt, you should be able to sit comfortably, balanced, without the need for any particular back support. This is the reason most people sit with better posture on an inflatable exercise ball.

Sitting on an exercise ball, your hips are typically higher than your knees, and the natural curvature of the ball tends to rock the pelvis slightly forward so that you are balanced over what yoga practitioners call your “sit bones”.

Anatomically these are known as the ischiums, and they make up the part of your pelvis that is closest to the ground. You can feel them simply by putting your hands under your buttocks when you’re sitting.

Balance is key. If our spine is centered over our pelvis, it takes very little energy to maintain good, low stress posture. It’s only when we slouch, lean too far forward, or too far back that we have to engage extra, non-postural muscles to hold our position.

As far as exercise balls go, there’s nothing wrong with using one as your regular “chair” of choice. Most people will prefer the aesthetics and extra adjustability of a well-made office chair, however, so read on.

Gentle Reminders

Now that the base of your seat is at the right height and tilt, you can adjust the back support of the chair. Once you’re sitting in a balanced, tall position, with hips higher than knees, simply adjust the back of the chair until it gently contacts your lumbar area.

The seat back should essentially function as a reminder when you begin to slouch. When you do, your spine will press more firmly into the back of the chair. This additional pressure will serve as your cue to get yourself back into a good position.

The next reminder comes from the armrests. Sitting tall, your shoulders should be relaxed, hanging loosely from your torso. Your elbows should be bent at 90 degrees or more, so that your forearms are angled slightly down from elbow to wrist.

Assuming this position, bring the armrests up so that they gently touch the undersides of your forearms. Once there, if you start to slouch your forearms will rest more firmly on the armrests, and your shoulders will start to sneak up closer to your ears. That’s your wake-up call to get back where you need to be.

The Desk is Next

The base is at the right height. You’re sitting balanced over your pelvis. Your forearms are angled slightly downward. Your wrists are not bent, but are flat and relaxed so that you don’t engage any more of your forearm musculature than is absolutely necessary.

Now, look at your hands. Right where they’re placed is the level that your desk should be. More accurately, this is where your keyboard should be, so your desk should actually be placed an inch or two below that.

Notice that we did not determine what level your desk should be until we got your chair setup exactly as we wanted it. We’re obviously assuming that you have a desk that is capable of having its height adjusted. If not, you have options.

First, you have some room to play with the height of the chair. As long as you keep your hips higher than your knees, and you can tilt the base so that your legs are comfortable, you can raise the chair until your hands rest comfortably at the level of your keyboard.

If your desk is set too high, you may run into a couple of problems. You might not be able to tilt the base of your seat enough to get comfortable. Or, in order to get your hands at the right height you might have to raise the chair so high your feet come off the floor.

In these cases a footstool can be a lifesaver. You can find them at most office supply stores and they’re made for this very reason. Using a footstool your legs will be able to rest comfortably using a chair that is set high enough to get the rest of your body into a good position.

If your chair won’t raise you high enough to get you into the correct position relative to your desk, sometimes a keyboard and mouse tray that slide out from underneath the desk will solve the problem. Consult your local office supply store for options here. If that’s not possible, it’s time to invest in a new chair, desk, or both.

Look Up to Work

The last thing we adjust is the position of your monitor. Don’t skimp on this one. Neck problems that end up causing shoulder, arm, or hand pain are frequently caused by chronically poor head position.

Where do you put it? Right where your eyes go. Place the center of the screen at eye level. You can pick up a monitor riser or even a cantilevered stand to set it at just the right spot. Again, consult your local office supply store. In a pinch, a couple of phone books will also do the trick.

Many “ergonomic guides” that come with computers and monitors recommend placing the top of the screen at eye level. This is too low. Your head will follow your eyes. If your monitor is set on your desk before long you’ll find your neck craning forward so that you can look into the screen.

Finally, make sure the screen is at least a couple of feet from your eyes. Any closer and the constant glare of the screen so close to your face will cause eye strain. Any further and you’ll find yourself bending over your desk to get close enough to the screen to be able to read what is on it.

If you have to use reading glasses or bifocals to see the screen clearly, do yourself a favor and invest in a pair of computer glasses. These are glasses that are designed for computer use.

The entire lens, as opposed to just the bottom half, is devoted to the distance at which you would read from the monitor. This way you’re not constantly tilting your head back and looking down your nose to take care of your daily work.

The Bottom Line

With any setup for a repetitive activity, use your body as a guide. The error often made is in attempting to mold your body to a new task or piece of equipment. This is approaching it backwards.

Always try and position yourself in the most neutral, stress free position and then attempt to adapt your task around it. For this reason it pays to invest in desks and chairs that are as adjustable as possible. This gives you the most freedom to play with different positions and find the one that keeps you at ease.

Investment is an appropriate term here. Anything you’re going to spend hours a day on — for weeks or years at a time — is worth a little extra financially. The return you get in reduced stress, tension, and injury will be well worth it.